The Universal Core vocabulary is a set of 36 highly useful single words that can be used alone or in combination to communicate for a range of purposes on countless topics with a wide variety of communication partners. The Universal Core vocabulary is licensed under a Creative Commons Attribution-Sharealike 4.0 International License. Several formats are available to support student access through direct pointing or touch, eye gaze selection, and partner-assisted scanning. High contrast versions are available to address the needs of some students with visual impairments and 3D symbols are available for students who are blind. Additionally, the Universal Core vocabulary is available on many communication apps and speech generating devices.
Universal Core Communication Systems
- 3D Symbols
- 36 Location Universal Core Communication Board
- 36 Location Universal Core Classroom Poster
- 4 Square Universal Core Communication Book
- 9 Location Universal Core Communication Book
- 4 Inline Universal Core Partner-Assisted Communication Book
- 4 Corners Eye Gaze Universal Core Communication Book
- 6 Page Universal Core Communication Book
- 6 Inline Universal Core Partner-Assisted Communication Book
We have created a set of three-dimensional (3D) symbols to represent the 36 words in the Universal Core vocabulary. Each tactual symbol is printed on a base that has a shape, texture and color that mark the word category. Each also includes a unique raised element, the printed word and braille to make the individual word. The table below details the rules for the base shapes.
|
Word Class |
Shape |
Edge Texture |
Color |
|---|---|---|---|
|
adverb |
circle |
bumps (reverse golf ball dimples) |
yellow |
|
adjective |
heart |
smooth |
blue |
|
pronoun |
hexagon |
cross hatch |
white |
|
preposition |
square |
horizontal grooves |
green |
|
verb |
triangle |
vertical ridges like a quarter |
red |
|
noun |
trapezoid |
horizontal wavy grooves |
orange |
|
interjection |
pentagon |
single string of bumps (string of pearls) |
black |
In the current version of all of the symbols, you’ll find a hole through the center of the shape instead of a loop handle, changes to the texture around the outside of several shapes to eliminate sharp edges, and improved braille.
- Download the STL (STereoLithography) files.
- Send to a 3D printer
We start by introducing three of the 3D symbols: GO, NOT, LIKE
These three words are very flexible and offer endless opportunities for teaching and learning across partners and contexts. Just start by printing these three symbols.
We start by identifying activities that involve movement (GO), student enjoyment (LIKE), or student refusal or displeasure (NOT).
Each time one of these opportunities occurs, we place the 3D symbol for GO, LIKE or NOT in the student’s hand and say (or sign if the student also has hearing impairments) the word. When the opportunity is complete, we remove the symbol.
For example, each time the student is going to move, use the opportunity to teach GO. Some examples of movement include:
- Moving around the school – Lets GO to media.
- Moving from one position to another – Let’s GO into your stander.
- Moving from one place to another – Let’s GO to group.
We look for any signs of pleasure to teach LIKE. For example, when the student smiles in response to a song, we teach LIKE (I think you LIKE that song). Other examples include:
- Laughing while swinging in PT – I hear you laughing. You LIKE to swing.
- Smiling while tasting ice cream – I see that smile. You LIKE ice cream.
- Increased breathing rate after hearing a favorite adult’s voice – You hear Ms. M? You LIKE Ms. M.
We look for signs of refusal or displeasure and use them to teach NOT. For example, when the student vocalizes in protest to a new position, we teach NOT (You do NOT like this). Other examples include:
- Turning head to refuse a drink – You do NOT want a drink.
- Scrunching up face in response to an odor – That does NOT smell good.
- Fussing when getting ready to go home – You do NOT like this.
We do not begin to introduce additional symbols until the student is beginning to reach for or otherwise indicate some beginning understanding that the three initial symbols have meaning. This does not mean that the student has to use or identify them independently, but we want them to show some emerging understandings before we start to introduce more. When we do go beyond the first three, we must have some system for organizing them so that students can begin to find a desired symbol and adults can continue to model and support learning at the rate that is possible with a focus on the first three.
Some basic rules to consider before going beyond the first three:
- Are adults in the environment consistently using GO, LIKE, and NOT throughout the entire school day? Until students are getting dozens of opportunities to learn and use these three words every day, don’t add new symbols.
- Is the student demonstrating emergent understanding that the symbols GO, LIKE, and NOT carry meaning? If the student is not demonstrating some expressive understanding and use, don’t add new symbols.
When you are ready to add new symbols, have a plan to organize and teach them every day. Symbols that are not used dozens of times each day, can’t be learned. Unlike children with vision, students who are using the 3D symbols don’t have incidental opportunities to learn the symbols just by looking for a known symbol on a communication board. Students with significant visual impairments and significant cognitive impairments are dependent on us to provide opportunities to learn.
When you are ready to add more symbols, here are the rest for download in STL file format:
- All BLUE 3D Symbol (STL)
- Can RED 3D Symbol (STL)
- Different BLUE 3D Symbol (STL)
- Do RED 3D Symbol (STL)
- Finished BLUE 3D Symbol (STL)
- Get RED 3D Symbol (STL)
- Go RED 3D Symbol (STL)
- Good BLUE 3D Symbol (STL)
- He WHITE 3D Symbol (STL)
- Help RED 3D Symbol (STL)
- Here YELLOW 3D Symbol (STL)
- I WHITE 3D Symbol (STL)
- In GREEN 3D Symbol (STL)
- It WHITE 3D Symbol (STL)
- Like RED 3D Symbol (STL)
- Look RED 3D Symbol (STL)
- Make RED 3D Symbol (STL)
- More YELLOW 3D Symbol (STL)
- Not YELLOW 3D Symbol (STL)
- On GREEN 3D Symbol (STL)
- Open RED 3D Symbol (STL)
- Put RED 3D Symbol (STL)
- Same BLUE 3D Symbol (STL)
- She WHITE 3D Symbol (STL)
- Some YELLOW 3D Symbol (STL)
- Stop RED 3D Symbol (STL)
- That WHITE 3D Symbol (STL)
- Turn RED 3D Symbol (STL)
- Up GREEN 3D Symbol (STL)
- Want RED 3D Symbol (STL)
- What YELLOW 3D Symbol (STL)
- When YELLOW 3D Symbol (STL)
- Where YELLOW 3D Symbol (STL)
- Who YELLOW 3D Symbol (STL)
- Why YELLOW 3D Symbol (STL)
- You WHITE 3D Symbol (STL)
Designed for students to have personal access to all day to communicate, and for teachers to use while modeling. Layout is best suited to students whose language, vision and access abilities support visually scanning an array of 36 words/symbols and pointing to make selections. Large, 2-page, versions available.
- Print to standard letter paper in landscape orientation.
- Laminate.
Poster layout is best suited to small group or whole class instruction. Teachers can model using the core vocabulary in flexible ways throughout a lesson at a size that is accessible to many students.
- Print on a poster printer at 24” x 28”.
- Laminate.
Boardmaker Studio
LessonPix
Picture Communication Symbols
SymbolStix
Widget Symbols
9 page universal core communication book with 4 words/symbols on each page. Layout is best suited to students who benefit from larger symbols in a smaller array to meet language, vision and access needs. Designed for direct selection. Students may need support navigating through the pages. Designed for students to have personal access to all day to communicate, and for teachers to use while modeling. High contrast version available.
- Print to standard letter in landscape orientation.
- Laminate each page.
- Bind 9 page book.
Boardmaker Studio
Boardmaker Version 6
LessonPix
Picture Communication Symbols
SymbolStix
Widget Symbols
4 page universal core communication book with 9 words/symbols on each page. Layout is best suited to students who benefit from medium symbols in a smaller array to meet language, vision and access needs. Designed for direct selection. Students may need support navigating through the pages. Designed for students to have personal access to all day to communicate, and for teachers to use while modeling. High contrast version available.
- Print to standard letter in landscape orientation.
- Laminate each page.
- Bind 4-page book.
Boardmaker Studio
LessonPix
Picture Communication Symbols
SymbolStix
Widget Symbols
9 page universal core partner-assisted communication book with 4 words/symbols on each page. Layout is best suited to students who benefit from partner-assisted scanning to hear or see each word as it is presented by a communication partner. As words/symbols are presented, the communication partner identifies and responds to a student’s individualized ways of indicating a selection. Designed for students to have personal access to all day to communicate, and for teachers to use while modeling. High contrast version available.
- Print on standard letter paper in landscape orientation.
- Cut each page in half.
- Laminate the half-sheets.
- Bind 9 page book(s).
Note: To conserve paper, each printed page includes 2 copies of the half sheet communication pages.
Boardmaker Studio
Boardmaker Version 6
Picture Communication Symbols
SymbolStix
Widget Symbols
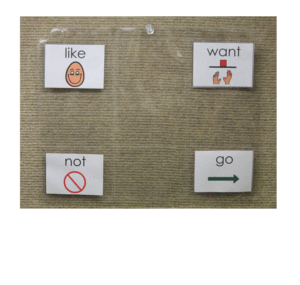
9-page Universal Core book with symbols in each corner of see-through pages. Layout is best suited to students who can learn to use eye gaze to select symbols. High contrast version available.
- Set printer to print on both side and flip on the long edge.
- Cut out each of the symbols.
- Place in corners of 9 transparent sheets. Note: Sets of trading card sheets are available from many companies and work well.
- To support consistency with other layouts, follow the symbol location recommendations (on the last page of the download)
Picture Communication Symbols
SymbolStix
Widget Symbols
6 page Universal Core communication book with 6 words/symbols on each page. Layout is best suited to students who benefit from medium symbols in a smaller array to meet language, vision and access needs. Designed for direct selection. Students may need support navigating through the pages. Designed for students to have personal access to all day to communicate, and for teachers to use while modeling.
- Print to standard letter in landscape orientation.
- Laminate each page.
- Bind 6-page book.
Boardmaker Studio
Picture Communication Symbols
SymbolStix
6 page Universal Core Partner-assisted Communication book with 6 words/symbols on each page. Layout is best suited to students who benefit from partner-assisted scanning to hear or see each word as it is presented by a communication partner. As words/symbols are presented, the communication partner identifies and responds to a student’s individualized ways of indicating a selection. Designed for students to have personal access to all day to communicate, and for teachers to use while modeling.
- Print on standard letter paper in landscape orientation.
- Cut each page in half.
- Laminate the half-sheets.
- Bind 6-page book.